
|
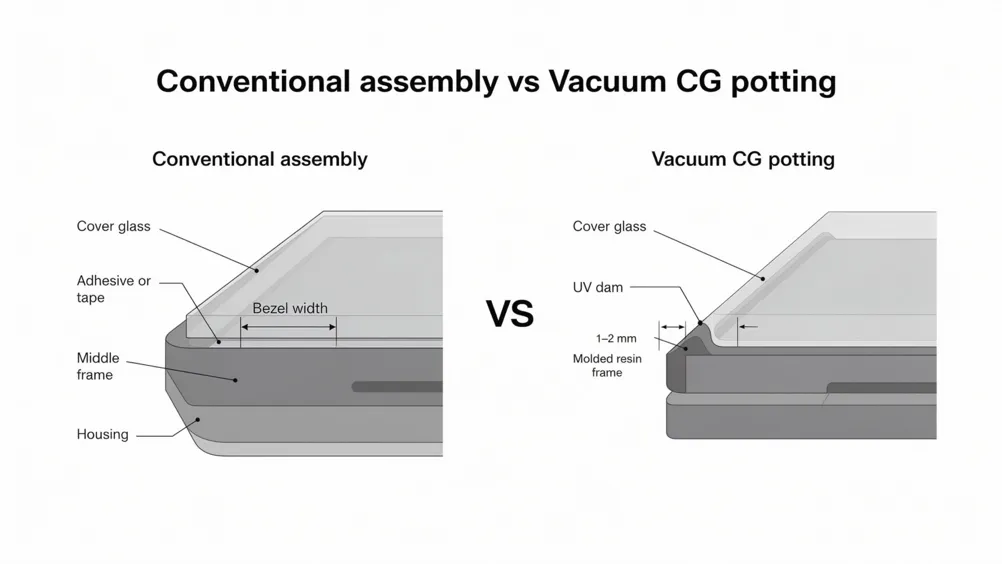
Short answer: Vacuum CG potting forms the frame structure directly on the cover glass: a UV-cured dam is dispensed first, then epoxy or UV resin is poured under vacuum and cured. Because several structural layers are molded in one step, bezels can shrink to about 1–2 mm and assembly steps drop. The main choice is UV curing (lower energy) or thermal curing (for epoxy systems). |
Every generation of phones, watches and tablets asks for a bigger screen in the same outline. The display itself is rarely the limit. The limit is the stack around it: a middle frame, adhesive or tape to hold the cover glass, sealing, and the tolerances between all of them. Each layer adds width at the edge and thickness overall. Vacuum CG potting takes a different route. Instead of assembling a frame around the cover glass (CG), it molds the frame structure onto the glass. This article explains how the process works, how a complete production line is laid out, and how to choose between UV and thermal curing.
What vacuum CG potting is, and how it differs from injection molding
In our brochure, this process is called a low-pressure injection molding process. The name can mislead, because there is no injection screw and no molten plastic. Liquid resin is poured into a mold that holds the cover glass, under vacuum, and then cured in the mold. The result is a resin structure bonded directly to the CG surface.
The process uses two materials:
• The dam. A UV adhesive is dispensed as a dam and cured with UV light. It defines the edge of the pour and keeps the main resin where it should be.
• The main pour. Either an epoxy resin, cured at constant temperature (with or without constant pressure), or a UV resin, cured with light.
Here is how it compares with the two methods most teams know today:
| Conventional assembly | Injection molding (insert or overmold) | Vacuum CG potting | |
| How the frame is made | Separate frame, then cover glass bonded with adhesive or tape | Molten plastic injected around an insert under high pressure | Liquid resin poured onto the CG under vacuum and cured in the mold |
| Layers at the edge | Frame + adhesive + glass, each with its own tolerance | Molded part + glass | Dam + molded resin structure on the glass |
| Load on the glass | Low, during bonding | High pressure and heat during injection | Low; the resin is poured, not injected |
| Bezel width | Set by frame wall and adhesive width | Set by minimum wall thickness and tooling | About 1–2 mm (per our process brochure) |
| Assembly steps after forming | Several | Some | Fewer, because several functional structures are formed in one step |
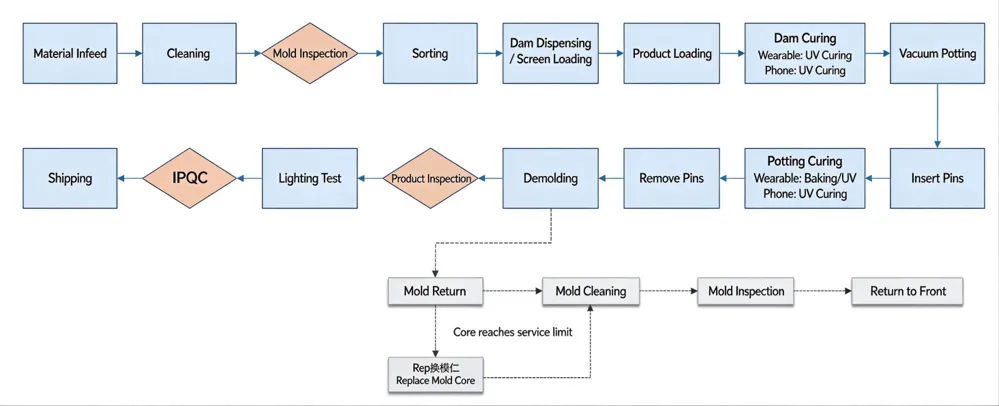
Step-by-step process route
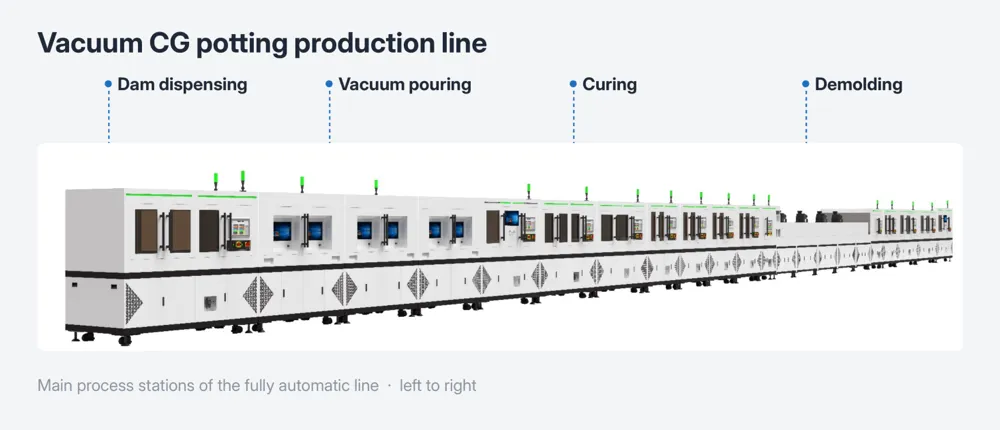
A production line follows the route below. Each step exists to protect the next one, which is why the inspection points matter as much as the process stations.
| # | Step | Purpose |
| 1 | Loading | Cover glass or screen assemblies enter the line |
| 2 | Cleaning | Removes particles and contamination before bonding |
| 3 | Mold inspection | Checks that the mold is clean and complete before use |
| 4 | Sorting | Separates parts and routes them to the next station |
| 5 | Dam dispensing / screen loading | Dispenses the UV dam and places the screen; the reference layout includes plasma treatment at this stage |
| 6 | Product into mold | Places the part into the mold |
| 7 | Dam curing | Cures the dam with UV light |
| 8 | Vacuum pouring | Pours the main resin under vacuum |
| 9 | Pin insertion | Fixes the mold; parts that fail the check are rejected as NG |
| 10 | Potting cure | Wearables: baking or UV; phones: UV (per brochure) |
| 11 | Pin removal | Releases the mold; second NG check |
| 12 | Demolding | Removes the cured part from the mold |
| 13 | Product inspection | Checks the molded structure |
| 14 | Light-up test | Powers the display to confirm it was not damaged |
| 15 | IPQC and shipping | In-process quality check before packing |
The molds run in their own loop. After demolding, the upper and lower molds return, are cleaned and inspected, and go back to the front of the line. When a mold core reaches its set number of uses, it is replaced. That loop is as important as the product route, because a dirty or worn mold shows up directly as a defect on the finished edge.
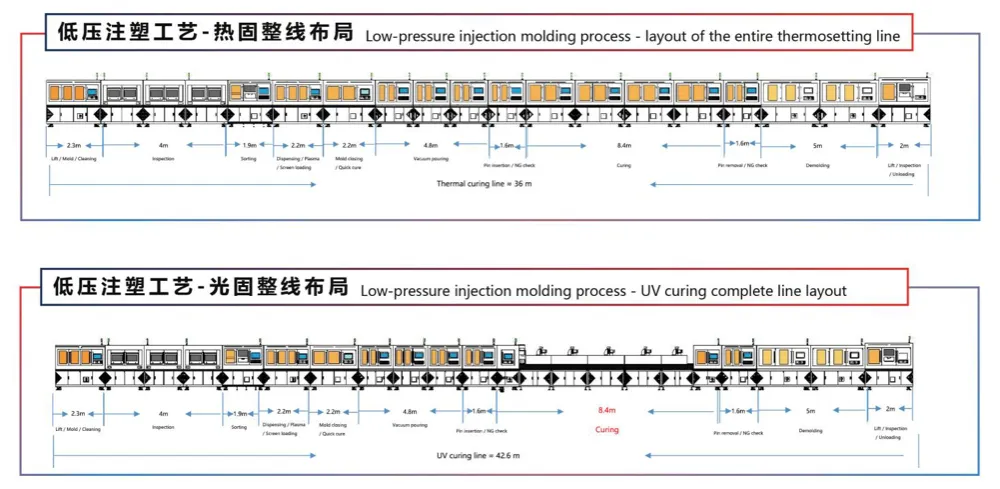
UV curing line vs thermal curing line
The main pour decides the curing route, and the curing route decides much of the line. Both lines share the same stations for cleaning, inspection, dam dispensing, vacuum pouring, pin handling and demolding. The difference is the curing section and the material behind it.
| Criterion | Thermal curing line | UV curing line |
| Main resin | Epoxy resin | UV resin |
| Curing method | Constant-temperature oven (with or without constant pressure) | LED UV light |
| Energy | Oven heating | LED cold light source with low energy consumption |
| Reference line length | About 36 m | About 42.6 m |
| Curing section in reference layout | About 8.4 m | About 15 m |
| Typical products (per brochure) | Wearables (baking route) | Phones and wearables (light route) |
| Watch points | Temperature uniformity and cure time; heat on the display | Light must reach the resin; shadowed areas and resin thickness |
Two points from this comparison are often misunderstood. First, UV curing does not automatically mean a shorter line. In our reference layouts, the UV line is the longer one, because its curing section is longer. Second, the line lengths are reference layouts from our brochure, not fixed specifications. The real length depends on your takt, part size, resin and cure schedule.
For the thermal route, our process work aims to reach, with a constant-temperature oven, the same yield as constant-temperature, constant-pressure curing. For the UV route, the cure section uses LED light sources. If you are new to UV LED curing, our UV LED curing systems page explains the equipment, and our article on UV curing problems covers how to match wavelength and dose to the resin.
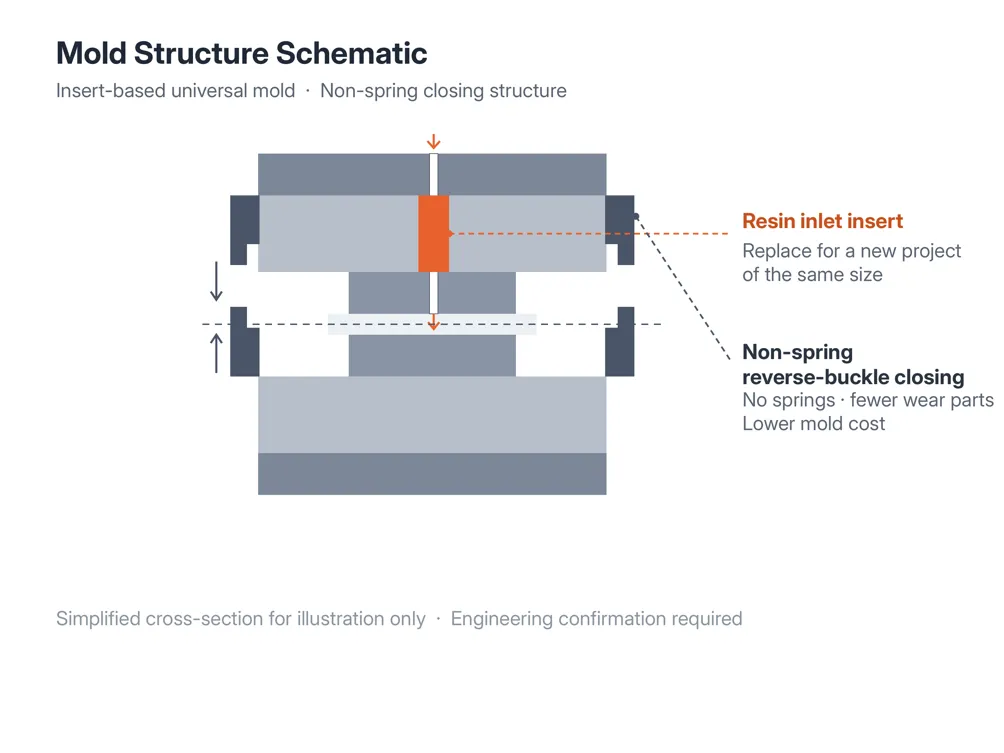
Mold design choices that drive cost
In this process, the mold is a production tool that cycles through the line many times per shift. Its design affects cost, changeover time and edge quality. Two design choices make the biggest difference:
• A non-spring, reverse-buckle mold structure. Springs wear and lose force over many cycles. A closing structure without them has fewer wear parts, and our brochure credits it with lower mold cost.
• Insert-based universal molds. For a new project of the same size class, only the resin inlet insert is replaced instead of the whole mold. This lowers mold cost and shortens the start of a new project.
We do not quote a percentage saving for these choices, because the saving depends on how many projects share one mold base and how often your products change. Ask any supplier who quotes a fixed saving what baseline it was measured against.
Yield killers and how the line controls them
Most defects in CG potting come from a short list of causes. A well-designed line puts a station or a check against each one:
| Defect | Typical cause | Where the line controls it |
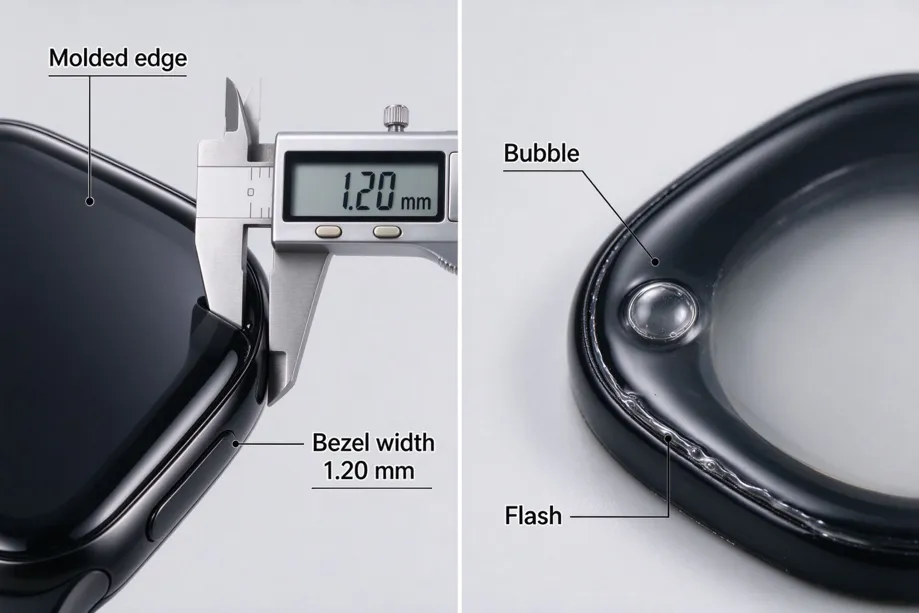
| Bubbles in the molded edge | Air trapped in the resin or in the mold cavity | Vacuum pouring; clean, complete molds from the mold inspection loop |
| Poor adhesion or edge lifting | Contamination on the glass surface | Cleaning and plasma treatment before dam dispensing |
| Resin overflow or flash | Broken or uneven dam, worn mold | Controlled dam dispensing and UV dam curing; mold core replacement after a set number of uses |
| Incomplete cure | Too little heat or light for the resin and thickness | Defined cure schedule per the resin TDS; curing section sized for takt |
| Damage at demolding | Mold sticking, wrong demolding force | Mold design, mold cleaning, dedicated demolding station |
| Display damage | Heat, pressure or handling during the process | Light-up test after demolding, then IPQC |
The dam and the mold form the visible edge of the product, so small problems there show up directly as cosmetic defects. That is why the line treats mold cleaning, mold inspection and dam quality as process steps with their own checks, not as maintenance tasks.
Is this process right for your product?
Vacuum CG potting is a strong option when:
• Bezel width and screen-to-body ratio are selling points of the product.
• The product is a phone, wearable, tablet or notebook display module, which is what the line is designed for. On wearables, both flexible and rigid screens are in scope, according to our brochure.
• Volumes are high enough to justify a dedicated line, or several same-size projects can share one mold base.
• You want fewer assembly steps and a thinner, stronger structure at the edge.
It may not be the right fit when volumes are low and the product changes shape often, when the cover glass design cannot be sealed by a dam, or when the resin cannot be qualified for your reliability tests. In these cases, a conventional frame with precise glue dispensing may be the better choice. For the general difference between potting a part inside a housing and molding a protective structure, see the difference between potting and encapsulation.
Dongguan Xinhua Intelligent Manufacturing Co., Ltd. (XINHUA) designs the key equipment of this line itself, including the vacuum potting machine, the dam dispensing machine and the demolding machine, and has filed patent applications for the line. If you are planning a narrow-bezel device, contact us to discuss a CG potting feasibility study.
FAQ
What bezel width can vacuum CG potting achieve?
Our process brochure gives about 1–2 mm. The real width depends on the cover glass design, the dam, the resin and your mechanical and reliability requirements, so it should be confirmed with samples for your design.
Which resins are used for the dam and the main pour?
The dam is a UV adhesive cured with UV light. The main pour is either an epoxy resin cured at constant temperature, with or without constant pressure, or a UV resin cured with light. The resin supplier's TDS sets the cure schedule.
How long is a complete CG potting line?
Our reference layouts are about 36 m for a thermal curing line and about 42.6 m for a UV curing line. These are reference figures; the final length depends on takt, part size and the cure schedule.
Can the same mold be reused for different models?
For projects of the same size class, yes in principle. The mold is designed so that only the resin inlet insert needs to be replaced. A different size or edge geometry needs a new mold.
Is UV or thermal curing better for wearables?
Both are used. Our brochure lists baking or UV for wearables and UV for phones. Choose by the resin that passes your reliability tests, how sensitive the display is to heat, and whether light can reach all of the resin. A sample trial with your cover glass is the fastest way to decide.